Last year I did a twine exchange with a group of crafty friends here in Colorado, and ended up with some beautiful twine. We all chose a colour and dyed our own twine and enough for everyone else. So now I have lots of very pretty twine and wanted to come up with a different way of using it - this is my idea, Twine Flowers.

You really don't need any special equipment to do this, if you have twine then I pretty sure you can find the rest of the items in your stash. Here is what you need.

Chipboard or card from cereal boxes, a circle punch (mine is 1 3/4"), a pencil, a ruler, adhesive, dressmakers pins, a large darning type needle and twine.
First punch out your circles from the chipboard, take you ruler and pencil and mark one of the circles like this.

I usually draw 6 lines on mine to divide it up as you would for a clock-face. There is no need to be exact on this. Next take your adhesive and stick the circles together, leaving the lines you have made on the one circle outermost. Take the pins and push them in between the circles about half way, in line with your pencil lines, like so.


Take your twine and start wrapping it around your 'loom'. This is difficult to explain, but I took lots of pictures, so I hope that helps. The way I try to do this is by winding my twine first around the '12 o'clock pin' and then taking it down and winding it around the '6 o'clock pin'. Next take the twine up to '11 o'clock' and the down to '5 o'clock' ,and so on.
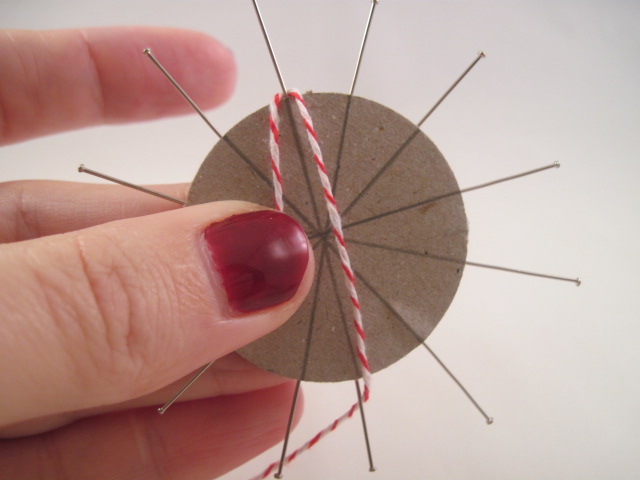


When you have been around the 'loom' once, go around again - each pin should have two loops of twine around it, and should look something like this.

Cut off the twine, leaving a long 'tail' (about 12") and thread the end through your needle.

Now you just need to secure all you flower by threading the needle through the back of the petals and back-stitching. Hopefully the following pictures will show you exactly what I mean.


Continue in this manner until you have secured all the 'petals', your flower should look something like this.

Next take your needle and secure the thread by making a couple of stitches through the center of the flower - no need to be particularly neat as this will be the back of the flower.

The last step is to remove the pins, and your flower is all ready to use.


This is how I used my twine flowers, how will you use yours?


Until next time.
Michelle
Michelle
Michelle,
ReplyDeleteWhat a great way to use our supplies. Thank you for sharing your idea for making our own template to make the flowers!
Lovely flower & a great tutorial. Tfs
ReplyDeleteThese turned out amazing. What a great idea.
ReplyDeleteOh my word Michelle! Thank you SO much for this tutorial! I just bought a HUGE lot of bakers twine to sell in my zibbet shop and am loving this for examples of use, and possibly making to sell! (I come to your blog through being on Kelleigh's CT with you!) I am originally from Colorado and can't wait to check out the rest of your blog!
ReplyDeleteThese are very cool! Super unique and creative :)
ReplyDeleteFabulous! Thanks for sharing how you made them too!
ReplyDeleteGeorgiana
Carson's Creations
These are so clever. A cheap reusable loom too. Yay.
ReplyDeleteHow did you die the twine? You and your friends got such beautiful colors.
Some people used alcohol inks and others used Dylon dye packs - I'm going to try using cold tea dyeing method next.
ReplyDelete