Thursday, December 22, 2011

'Merry Christmoose' Lever card

Just a very quick post.  Here is the card I made on for my husband during my 'snow day crafting session'.


This style of card is called a lever card.  I got the file from SVG Cuts.  It is super simple to make (Mary at SVG Cuts gives great video tutorials with very clear instructions.)


Sorry about the shadow on this photo - couldn't figure out the best way to take this photo without one.
This is what the inside looks like.


This paper is called 'Yuletide' - double-sided cardstock from K & Co.  The image and sentiment are stamps I bought from a scrap booking show several years ago, and are by Eureka Rubber Stamps.

Hope everyone has a fabulous Christmas.  Thanks for stopping by.

How to spend a snow day...

...playing in your craft room of course.  At least 15 inches of the cold white stuff.  What else can a girl do but craft?  This really was an excellent excuse for me to finish a few cards for family members.

These are for my daughters.


They are not actually cards, but rather gift card holders - all ready to hold a special surprise (can't say what, just in case they are looking!)

Here is a look at the inside.


As you pull up the flap of the handbag the inside slides up to reveal a gift card.  This is a file that I got from the Silhouette online store, and cut with my Cameo machine (I love this machine.) The  double-sided paper is called 'Yuletide' by K & Co, the glitter paper is by Colorbok, the snowflakes are a MS punch, the flower punch is from Marvy, the bling and "Naughty or Nice?" stamp I picked up at M's in the dollar bin.  Here is a close up.


Fingers crossed that I might be able to squeeze another post in before Christmas.  Thanks for visiting.

Monday, December 19, 2011

Outhouse Christmas Card

Well, I didn't get time to finish the Christmas cards I made for my neighbors yesterday - just finished them today.  This is a very simple card, which appeals to my rather 'lavatorial' sense of humour - not an original idea, my inspiration came from here.  I actually completely copied the original card from the website (with the creators permission, of course) and made it for my husband last year.

As I said the card is very simple and has only two images from the Camp Out (outhouse) and Jolly Holidays (wreath) cartridges.  The 'outhouse' is cut at 4 1/2", the wreath is cut at 1", the snow on the ground are strips of torn text weight paper layered over each other, the wreath is embellished with red Beads in a Bottle and the snow on the roof is 3D paint (both from Tulip.)


The sentiment inside reads "Wishing you a Merry Christmas from 'outhouse' to yours."

Thanks for taking a peek at my blog.

Saturday, December 17, 2011

Limoncello Time!

Just a quick post today - my Limoncello is all bottled up and ready to go, YIPPEE!  I started making this back in September, bottled it up yesterday and made the labels for it today.

The recipe for limoncello can be found here.  I found this recipe and made it last year, and as it was a big hit with everyone I gave it to I decided to make more this year.


The label is the lemon cut at 4" from the Just Because Cards cartridge, and attached to the bottle with some twine.

Well, that's it...told you it would be a quick post.  Cheers!

Friday, December 16, 2011

Have a Divalicious Christmas

A second blog post in as many days - I'm on a roll here.  More Christmas cards to go out today to a bunch of lovely ladies I know.  I have been working on them for quite some time.


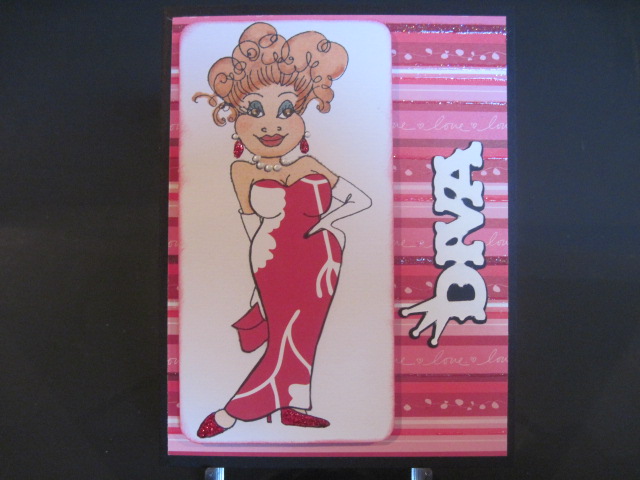
The reason it has taken me so long to complete these cards, was because of all the colouring with Pro Markers (and don't even get me started on choosing the various papers for backgrounds.)  The stamp is called Keisha by Loralie Art Stamps, and I knew as soon as I saw her in a the wonderful Artsy Store I had to have her :)


Here is a close up of some of the detail - stickles and beads in a bottle used for the bling.  The "Diva" cut comes from the cartridge Rock Princess, and is cut at 1".  I am embarrassed to admit here that I took these photos before I had actually finished them, there is now a crown with a little more bling on the Diva cut.  I really should have taken more pictures, but I was already covered in stickles/glitter and didn't want to risk getting in on the camera as well.

As I mentioned yesterday I love my Pro Markers (hope Santa brings me some more) - the colours blend so beautifully, and even though I'm a complete beginner I didn't think they turned out too bad.  I have to say a big thank you to Enfys from Going Buggy - she was the one that introduced me (via her website) to Pro Markers and she has done some great tutorials with them.  I got my Pro Markers from Carpe Diem Store, they are an amazing price when you compare them to Copics.

These cards also involved another favourite thing of mine to do - paper-piecing.  I know since having die-cutting machines I am quite lazy when it comes to scissors, but I really love the look of changing these stamps with different papers.  Another close-up for you.


Well, that is all for today.  Who knows if I keep all this crafting energy up I may post tomorrow as well ...

Thursday, December 15, 2011

Hoppy Christmas

Wow, I have neglected my poor little blog for almost two weeks (shame on me.)  In my defense I have been busy shopping, decorating, cleaning the house and getting ready for my mum to come and visit from the UK.  Well, no more excuses, and no more putting off making some Christmas cards.

Here are some cards that I have made for some crafting pals here in Colorado, our CCC group (affectionately nicknamed by my husband as the "Colorado Crafting Coven".)


This style of card is called a Petal Card.  There is a great tutorial for it over on Splitcoast Stampers - there are step-by-step instructions as well as a video tutorial.  The video shows the base of the card being cut with nestabilities, but I used scalloped circles cut on my Expression at 3 1/2".  The patterned paper, and glitter card stock is from J's (all from the dollar bin!)  The frog is from a Lettering Delights file, and cut with my new Silhouette Cameo (which I love) using the print and cut option.

The scallop circle that the frog is on is 2", the frog itself measures about 1 3/4" and the Cameo cuts it with ease.  Here is a close-up.


This is what the card looks like when you remove the belly band and take a peek inside.


This was such a fun card to make, and goes together so quickly.  I really hope that my friends like it.


Thanks for taking the time to visit my blog.  I hope you'll come back soon to see my next cards, which I used ProMarkers for (another product I have fallen in love with.)  I'm using this for the holiday challenge that Allison has set over at Paper Craft Weekend Challenge.  Until next time....

Friday, December 2, 2011

Christmas Movie Boxes

Just after Thanksgiving is an exceptionally busy time for me - that's when I realise that I don't have many days left to pack up Christmas gifts to ship to the UK.  This year for some reason I'm a little more behind than usual, but thankfully my husband was at least on top of somethings.  Every year he makes a holiday movie to send to family and friends back in the UK, showing photos and video clips of what we have been up to during the year - this year I decided those Cd's needed prettier packaging.  This was the result.


As soon as I saw the Summer Blockbuster SVG Kit from SVGCuts.com, I knew this was just what I needed for our movies.  The boxes are so simply to make, they are in 2 parts, and this kit also includes a box without a window (as well as countless other goodies.)


This box is cut from 'Magic of the Season' paper pack (Hobby Lobby), and embellished with a snowflake from the Winter Lace cartridge (cut at 2 1/2").


The paper for this box is from an old DCWV Christmas stack I bought on clearance about 3 years ago, as was the 'Deck the Halls' embellishment.


I also used 'Magic of the Season' paper for this box and  embellished it with one of the poinsettias from the 3D Wintergreens SVG kit ( also available at SVGCuts.com.)  Here is a close-up of the poinsettia.


Wish me luck as I head out into the snow for the post office and get these to their final destinations.