Sunday, February 26, 2012

This is what awaits my return....

...a nice clean craft room.


I have lots of fun projects planned and can't wait to get started.  I hope you'll check back and see.

Michelle

Friday, February 24, 2012

Something you need in Florida....a THONG.

Yes you read that correctly, I'm giving my friends who are with me in Florida (and those joining us via skype) a thong.  Here is the packaging I made for it.


This is what the label says.


And here is what is inside.


A book thong of course, what were you thinking?

Until next time.

Michelle

Wednesday, February 22, 2012

Girlfriends Card

By the time you are reading this, hopefully I will be winging my way to sunny Florida leaving behind the snow of Colorado.  I'm to meet a wonderful group of friends, who I got to know online through crafting.  Most of us have not met each other in person but we chat over face book a lot (and I mean a lot!)

Unfortunately not everyone will be able to attend our retreat in person, there are four ladies who will be joining us via Skype.  So here is a little card I made for each of them.


This stamp is from Art Impressions and is from the 'Girlfriends' series.  I love these stamps, and had so much fun making these cards because it combined two of my favorite things paper piecing and colouring with ProMarkers.


I hope that you ladies will get as much pleasure the cards as I did making them.

Check back in on Friday and see what else I put in their packages.

Michelle

Thursday, February 16, 2012

Twine Flowers

Today I am guest designer over at The Bug Bytes, and want to say thank you to Pam for allowing me to play at her blog.

Last year I did a twine exchange with a group of crafty friends here in Colorado, and ended up with some beautiful twine.  We all chose a colour and dyed our own twine and enough for everyone else.  So now I have lots of very pretty twine and wanted to come up with a different way of using it - this is my idea, Twine Flowers.


You really don't need any special equipment to do this, if you have twine then I pretty sure you can find the rest of the items in your stash.  Here is what you need.


Chipboard or card from cereal boxes, a circle punch (mine is 1 3/4"), a pencil, a ruler, adhesive, dressmakers pins, a large darning type needle and twine.

First punch out your circles from the chipboard, take you ruler and pencil and mark one of the circles like this.


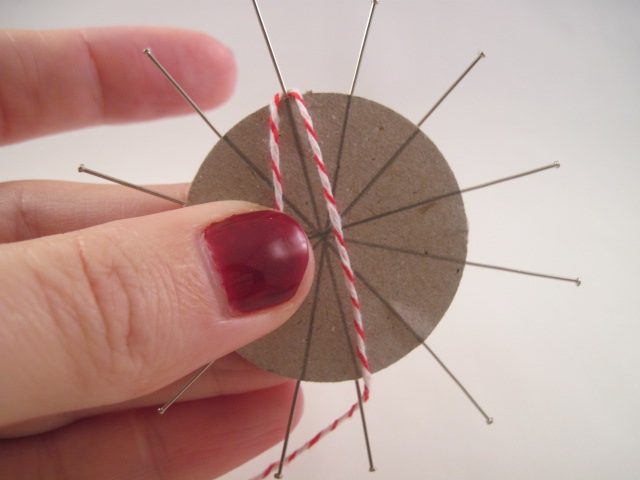
I usually draw 6 lines on mine to divide it up as you would for a clock-face.  There is no need to be exact on this.  Next take your adhesive and stick the circles together, leaving the lines you have made on the one circle outermost.  Take the pins and push them in between the circles about half way, in line with your pencil lines, like so.


Take your twine and start wrapping it around your 'loom'.  This is difficult to explain, but I took lots of pictures, so I hope that helps.  The way I try to do this is by winding my twine first around the '12 o'clock pin' and then taking it down and winding it around the '6 o'clock pin'.  Next take the twine up to '11 o'clock' and the down to '5 o'clock' ,and so on.


When you have been around the 'loom' once, go around again - each pin should have two loops of twine around it, and should look something like this.


Cut off the twine, leaving a long 'tail' (about 12") and thread the end through your needle.


Now you just need to secure all you flower by threading the needle through the back of the petals and back-stitching.  Hopefully the following pictures will show you exactly what I mean.


Continue in this manner until you have secured all the 'petals', your flower should look something like this.


Next take your needle and secure the thread by making a couple of stitches through the center of the flower - no need to be particularly neat as this will be the back of the flower.


The last step is to remove the pins, and your flower is all ready to use.


This is how I used my twine flowers, how will you use yours?


Until next time.

Michelle


Tuesday, February 14, 2012

Olive You

So this is my third and final Valentines Day card.  When I saw this file on Silhouettes online store it was yet another one I 'had to have'.


I just love how simple this card is, and the Cameo cut it beautifully (yes I am still in love with this machine.)  All the papers used for the 'olive' are from my scraps, and the main part of the card is cut from brown cardstock from "The Silky Smooth Stack" (DCWV) - you really  do need to feel how 'silky' this cardstock is, it's amazing.  I used some dimensional squares to make the olive pop-up, and lined the back of the sentiment with the same red cardstock.


This file also has a matching envelope and printed paper, so I just had to use that as well didn't I?


Happy Valentines Day, and Happy Birthday to my daughter Lauren. Thanks for stopping by today.

Michelle

Monday, February 13, 2012

Buxom Ladies - Treat Boxes

This is just a quick post to show you the treat holders I made for my daughter and her friends when we took them out to dinner last week.


The file comes from The DigiChick and is actually a 'Heart Cup' designed by Kelleigh Ratzlaff.  I knew when I saw them that they would be great to be transformed into 'Buxom Ladies' (maybe that's why my friends call me the smut queen.)

Here are a couple more.


These came together so quickly, I used some scraps from The Blackcurrant Stack (DCWV), some buttons and lace from my stash - that's it.


Phoebe and her friends got a big 'kick' out of them.  Now my mind is racing with ideas for how fun these would be for a bachelorette party or bridal shower with white ribbons and lace to make a corset.  What fun!

Here are a couple of photos of the girls enjoying their treats.


Thanks for stopping by.

Michelle

Sunday, February 12, 2012

Use your Stash - Color You Own Bling

Today I am guest designer over at Paper Craft Weekend Challenge - thank you Allison and Caroline for inviting me to play.

We've all got them, probably lots of them, because when we buy them, they usually come it big packs!  The 'them' I am referring to are gems - the clear type.  Mini round gems and faceted gems, I have a whole bunch.  But you don't always want clear ones for your project, so how about coloring them for yourself using alcohol inks?

All you need are the gems, some alcohol inks, paper towel and a little patience.


Take the gems and lay them on a piece of kitchen towel (use a craft mat or something else underneath to protect your work surface.)  Then take you alcohol ink and drop a small amount on the gem - you only need a very small amount, the ink will spread over your gem.


It really is as simple as that.  Now this is where the patience kicks in, as you have to wait for the gems to dry before using them on your project.

Here are some others I colored using the clear faceted gems.


The finished project.


As always, thank you for stopping by - see you next time.

Michelle