Today my card was inspired by (or maybe I should say 'enabled by') my friend Kymberlee over at The Paper Midwife. She is one of the gals from my Florida trip who helped me (a lot) with colouring with my Promarkers, and also introduced me to Mo's Digital Pencil. What can I say except "It's all her fault!" Those images are just too darn cute, and I love colouring.
If all that wasn't enough, she then tells me on her blog about Mo's Digital Challenge. Well, I just had to do it, here's my card.
Thank you Kymberlee - and a big ole hug to you, because I know you love it.
Michelle
Wednesday, April 18, 2012
Monday, April 16, 2012
Travel Game Set
Hi Everyone
I'd like to start off by saying thank you to everyone who visited and/or left comments over the weekend for the blog hop. I've never taken part in a blog hop before, your comments were truly appreciated and I hope you found as much inspiration as I did from visiting all the other talented crafters.
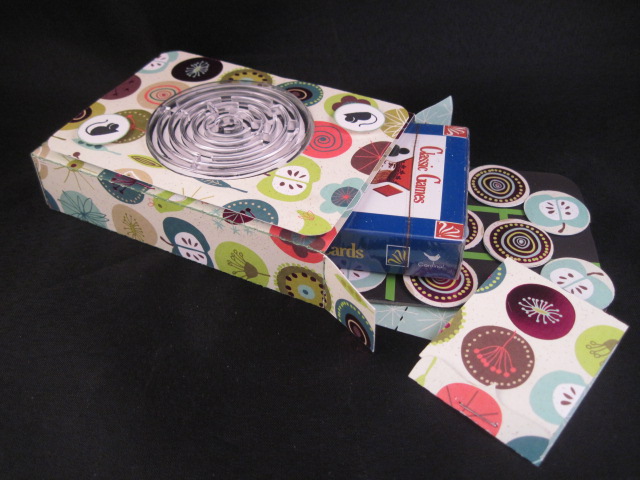
Today my project is a little travel game set.
The box that holds all these goodies comes from The Digi Chick. This template is designed by Kelleigh Ratzlaff, and comes with 2 different sized boxes. The smaller box is designed to fit a standard pack of cards - how much fun to gift a set of cards in a personalized box? I decided to use the larger box as I had a few more items to fit in. The paper I used for this is 'Greenhouse' designed by Carolyn Gavin from K & Co.
The first thing I made was the tic-tac-toe game. The base is cut from card stock using part of the template, and then adhered to a piece of magnetic material . The lines are strips cut from some remnants of vinyl, and the game pieces punched with a 1" circle punch (they are also adhered to the magnetic material.)
I added this cute little matchbook which is a Silhouette file from the online store.
I decided the outside of the box had to be fun too, so I used a maze and the "Totally A-maze-ing" stamp set (both from Stampin' Up.) I have to admit to wasting quite a bit of time while I was creating, trying to get the little balls into the center of the maze :)
The box itself went together so quickly, it is just cut in one piece and glued on one side so that you can open it at either end. Everything fits in there so perfectly - I may just add a little pencil and some candy to make it complete. Just something fun if you have little ones and a long car/plane ride in your future.
Thanks for stopping by today.
Michelle
I'd like to start off by saying thank you to everyone who visited and/or left comments over the weekend for the blog hop. I've never taken part in a blog hop before, your comments were truly appreciated and I hope you found as much inspiration as I did from visiting all the other talented crafters.
Today my project is a little travel game set.
The box that holds all these goodies comes from The Digi Chick. This template is designed by Kelleigh Ratzlaff, and comes with 2 different sized boxes. The smaller box is designed to fit a standard pack of cards - how much fun to gift a set of cards in a personalized box? I decided to use the larger box as I had a few more items to fit in. The paper I used for this is 'Greenhouse' designed by Carolyn Gavin from K & Co.
The first thing I made was the tic-tac-toe game. The base is cut from card stock using part of the template, and then adhered to a piece of magnetic material . The lines are strips cut from some remnants of vinyl, and the game pieces punched with a 1" circle punch (they are also adhered to the magnetic material.)
I added this cute little matchbook which is a Silhouette file from the online store.
I decided the outside of the box had to be fun too, so I used a maze and the "Totally A-maze-ing" stamp set (both from Stampin' Up.) I have to admit to wasting quite a bit of time while I was creating, trying to get the little balls into the center of the maze :)
The box itself went together so quickly, it is just cut in one piece and glued on one side so that you can open it at either end. Everything fits in there so perfectly - I may just add a little pencil and some candy to make it complete. Just something fun if you have little ones and a long car/plane ride in your future.
Thanks for stopping by today.
Michelle
Saturday, April 14, 2012
April Blog Hop
Welcome everyone to the April Blog Hop - if you've arrived here directly please 'hop' on over to The Bugbytes where the fun begins. Here is a list of all the blogs you can visit.
The theme for this blog hop is 'Crafty Me' or 'Craft Using Green'. For those of you who know me, know I don't really enjoy having my photo taken, and my craft room is such a mess - I opted to craft with 'green'.
I find that very often I don't have a masculine card on hand (for any occasion) because I have two daughters (therefore lots of pinks/purples/flowers etc. in my stash.) So I set myself the task of making a masculine card, using mainly green, and here is what I came up with.
This was such a simple card to make, it comes from an SVG file called 'All About Dad' available from SVG Cuts. As always Mary (the designer) provides great instructions for putting together all her files. The paper I used is from a stack called 'Wood Haven'. This card required a few different patterned papers to make up the panels on the body, by using a stack all the hard work was done for me and the papers compliment each other beautifully. Here are some close-ups.
And a look at the inside (I've left this blank to add an appropriate sentiment when I need it.)
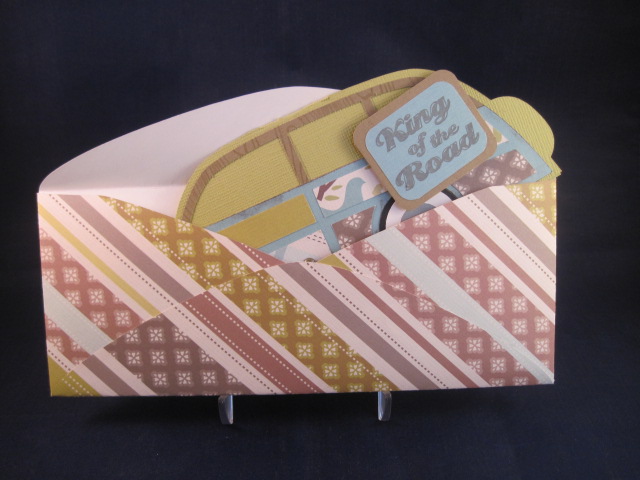
Another thing I love about SVG Cuts files is that many of them come with envelopes that fit the cards perfectly - like this one.
Thank you so much for stopping by , now hop on over to Beatrice's blog to see what creations she has in store for you.
Michelle
1) Pam - http://www.thebugbytes.com
2) Elizabeth - http://www.217creations.com
3) Michelle - http://ladyofleisureink. blogspot.com/
6) Debbie - http://debseclecticthoughts. blogspot.com
8) Bobby & Jill http://cricutcouple.blogspot. com
10) Chris - http://chatterscene-mom. blogspot.com/
11) Kimberli - http://kimberliscreations. blogspot.com/
12) Sheila - http://shesasassylady. blogspot.com/
The theme for this blog hop is 'Crafty Me' or 'Craft Using Green'. For those of you who know me, know I don't really enjoy having my photo taken, and my craft room is such a mess - I opted to craft with 'green'.
I find that very often I don't have a masculine card on hand (for any occasion) because I have two daughters (therefore lots of pinks/purples/flowers etc. in my stash.) So I set myself the task of making a masculine card, using mainly green, and here is what I came up with.
This was such a simple card to make, it comes from an SVG file called 'All About Dad' available from SVG Cuts. As always Mary (the designer) provides great instructions for putting together all her files. The paper I used is from a stack called 'Wood Haven'. This card required a few different patterned papers to make up the panels on the body, by using a stack all the hard work was done for me and the papers compliment each other beautifully. Here are some close-ups.
And a look at the inside (I've left this blank to add an appropriate sentiment when I need it.)
Another thing I love about SVG Cuts files is that many of them come with envelopes that fit the cards perfectly - like this one.
Thank you so much for stopping by , now hop on over to Beatrice's blog to see what creations she has in store for you.
Michelle
Tuesday, April 10, 2012
Rockin' Rollin' Birthday
I wanted to share with you the card and special item I made for my husband for his birthday this year. We have an old jukebox in our lounge filled with old 45's - I took this as my theme, and this is what I came up with.
First of all here is the card, in its 'envelope'.
The paper I used to make the record sleeve came from a stack I bought from Michael's ages ago, sorry I don't remember the name.
The papers I used for this are called Penelope's Potpourri (SEI) and were a Christmas gift from a secret 'elf' - thank you Allison. Here are some close-ups and pictures of the inside.
The spinner on the inside is from Stampin' Up, and the stamp is called 'Take a Spin'.
The other thing I made for him was this.....
This (as well as the card) are from SVG Cuts, a set called Rockin' and Rollin'. It looks quite complicated and time consuming to put together - but it really isn't at all. Check out the assembly tutorials by Mary (the designer), she explains everything so clearly step by step. Here are a few other pictures.
As you can see I used the same SEI papers, a stamp from the same Stampin' Up set, some buttons and beads in a bottle. The really neat thing about the jukebox is when you put a battery operated tea light inside (there is an opening in the back) the light glows through the vellum panels. Needless to say he loved it.
Thanks for stopping by.
Michelle
First of all here is the card, in its 'envelope'.
The paper I used to make the record sleeve came from a stack I bought from Michael's ages ago, sorry I don't remember the name.
The papers I used for this are called Penelope's Potpourri (SEI) and were a Christmas gift from a secret 'elf' - thank you Allison. Here are some close-ups and pictures of the inside.
The spinner on the inside is from Stampin' Up, and the stamp is called 'Take a Spin'.
The other thing I made for him was this.....
This (as well as the card) are from SVG Cuts, a set called Rockin' and Rollin'. It looks quite complicated and time consuming to put together - but it really isn't at all. Check out the assembly tutorials by Mary (the designer), she explains everything so clearly step by step. Here are a few other pictures.
As you can see I used the same SEI papers, a stamp from the same Stampin' Up set, some buttons and beads in a bottle. The really neat thing about the jukebox is when you put a battery operated tea light inside (there is an opening in the back) the light glows through the vellum panels. Needless to say he loved it.
Thanks for stopping by.
Michelle
Sunday, April 8, 2012
A simple stencil card.
Today I am guest designer over at Paper Craft Weekend Challenge. Here is a look at the card I made.
Hope you will take a look over there for all the details.
Michelle
Hope you will take a look over there for all the details.
Michelle
Friday, April 6, 2012
A Sweet Treat To Set You In A Spin
Hi Everyone. Sorry it's been so long since my last post, but once again real life has been getting in the way (hate it when that happens!)
I really love today's project - these candy dispensers are just way too cute. The file is from The Digi Chick, designed by Kelleigh Ratzlaff and, as usual, is super easy to assemble.
The spinner on the top of the box is from Stampin' Up, a set called 'Take a Spin' - you can also buy the arrow spinner brads which add to the fun.
The sentiment on the top of the dispenser is computer generated, and the font is called 'Petticoat Twist'.
The paper I used for the project is from Cosmo Cricket, and the bunny stamp (which I cut out and stuck to the front) is from Rubber Stampede.
The great thing about these dispensers is that you can open the top and refill them. Wouldn't they look great made in acetate and filled with colorful jelly beans?
Thanks for taking a peek at my project today.
Michelle
I really love today's project - these candy dispensers are just way too cute. The file is from The Digi Chick, designed by Kelleigh Ratzlaff and, as usual, is super easy to assemble.
The spinner on the top of the box is from Stampin' Up, a set called 'Take a Spin' - you can also buy the arrow spinner brads which add to the fun.
The sentiment on the top of the dispenser is computer generated, and the font is called 'Petticoat Twist'.
The paper I used for the project is from Cosmo Cricket, and the bunny stamp (which I cut out and stuck to the front) is from Rubber Stampede.
The great thing about these dispensers is that you can open the top and refill them. Wouldn't they look great made in acetate and filled with colorful jelly beans?
Thanks for taking a peek at my project today.
Michelle
Thursday, March 29, 2012
Felt Bag
Something different today - no paper involved! When I was in Florida last month I came back with a whole hoard of goodies - I couldn't actually fit everything in my suitcase and ended up mailing a package home. One of the goodies was this lovely felt bag. It was given to me by my friend Kymberlee (The Paper Midwife) - well actually it was from her mum.
I couldn't wait to get it home and start playing with it, but what to do HTV? Rhinestones? Finally I settled on using some of the mass quantities of felt I'd been given (also courtesy of Kymberlee's mum.) As the Silhouette does not cut felt (unless someone tells me otherwise) I had to find another method (and no I do not do well cutting out mass quantities with scissors.) So I turned to one of my Sizzix dies and came up with this.
I cut the leaves freehand and sewed the swirls by hand (as you can tell I AM NOT MUCH OF A SEAMSTRESS.) Here is a close-up of one of the flowers.
Overall I pretty pleased with the way it turned out - and it's fun once in a while to get out of your 'comfort zone'.
Thanks for stopping by.
Michelle
I couldn't wait to get it home and start playing with it, but what to do HTV? Rhinestones? Finally I settled on using some of the mass quantities of felt I'd been given (also courtesy of Kymberlee's mum.) As the Silhouette does not cut felt (unless someone tells me otherwise) I had to find another method (and no I do not do well cutting out mass quantities with scissors.) So I turned to one of my Sizzix dies and came up with this.
I cut the leaves freehand and sewed the swirls by hand (as you can tell I AM NOT MUCH OF A SEAMSTRESS.) Here is a close-up of one of the flowers.
Overall I pretty pleased with the way it turned out - and it's fun once in a while to get out of your 'comfort zone'.
Thanks for stopping by.
Michelle
Subscribe to:
Posts (Atom)