Hi Everyone
I'm taking a little break from colouring with my ProMarkers today and sharing with you another HTV baby onsesie project. One of my daughters roller derby friends recently had her first baby, so it was an excuse for me to break out the heat transfer vinyl and play, here is what I made.
The sentiment and the skate are cut using my Silhouette Cameo, the glitter HTV I found at Joanns and the font I used is called 'Smiley Monster'.
Of course I couldn't have a baby wearing a onesie with a statement on it that simply isn't true, so I made these to go along with it.
I found just a pattern for plain baby booties on the internet, knitted them up in black and added the pink pom poms - IRL they look so cute.
I finished the gift off by packaging it up like I did my last onesies, only using a single cupcake box which is also a Silhouette file.
Thanks for stopping by today.
Michelle.
Showing posts with label Heat Transfer Vinyl. Show all posts
Wednesday, February 6, 2013
Monday, January 21, 2013
A box of 'cupcakes' for a new little cupcake.
My project today was a definite 'labor of love'. I thought it was going to be fairly straightforward, but then I kept getting all these ideas (I blame Pinterest!) and one thing led to another. My hairdresser (and friend) is about to have her first baby next month, so I knew that I just had to pull out the heat transfer vinyl (HTV) and make some cute onesies and bibs. Here is what I came up with.
All the HTV was cut using my Silhouette Cameo - it just makes it all so easy. The font I used for 3 of the items is called 'Smiley Monster' - I love how this looks on baby things - one thing to remember when you are cutting fonts is to flip the words (mirror image) before you cut them. The glittery HTV is some new stuff I bought from Joann's, it is made by Tulip and called 'Shimmer Transfer'. These sheets have no backing, (so you do not need to reverse images or fonts), however if you cut out letters you have to lift them off the cutting mat individually and try to line them up perfectly on your project.
My next step was to find a way to package these - this is where I become quite distracted my Pinterest! I found several ideas, but the one I really liked was rolling up the items of clothing with a different coloured sock in the middle to make it look like a cupcake with a cherry on the top. You then take your cupcakes and present them in a cupcake box. Here is how mine turned out. First a look at the empty cupcake box.
This is a fie from the online Silhouette store, the file is designed by Lori Whitlock and is very simple to put together. Now with the cupcakes loaded.
And all ready to go.
This was such a fun project to make - I really hope my friend gets a kick out of it.
Thanks for stopping by.
Michelle
All the HTV was cut using my Silhouette Cameo - it just makes it all so easy. The font I used for 3 of the items is called 'Smiley Monster' - I love how this looks on baby things - one thing to remember when you are cutting fonts is to flip the words (mirror image) before you cut them. The glittery HTV is some new stuff I bought from Joann's, it is made by Tulip and called 'Shimmer Transfer'. These sheets have no backing, (so you do not need to reverse images or fonts), however if you cut out letters you have to lift them off the cutting mat individually and try to line them up perfectly on your project.
My next step was to find a way to package these - this is where I become quite distracted my Pinterest! I found several ideas, but the one I really liked was rolling up the items of clothing with a different coloured sock in the middle to make it look like a cupcake with a cherry on the top. You then take your cupcakes and present them in a cupcake box. Here is how mine turned out. First a look at the empty cupcake box.
This is a fie from the online Silhouette store, the file is designed by Lori Whitlock and is very simple to put together. Now with the cupcakes loaded.
And all ready to go.
This was such a fun project to make - I really hope my friend gets a kick out of it.
Thanks for stopping by.
Michelle
Tuesday, January 8, 2013
Redskins Sweatshirt HTV
Hi Everyone
I wanted to share this sweatshirt that I made as a Christmas gift for my husband - it was a huge hit. My husband is a big Redskins fan, (strange as we live in Colorado!) He became a fan way back in 1983 when he was in England. He was with some friends and they were watching the Superbowl between Miami Dolphins and the Washington Redskins - everyone else was cheering for the Dolphins so he decided to cheer for the Redskins. The Redskins won, and he has been a fan ever since (we even had a cheese plant named 'Joe Gibbs' and a fish named 'Dexter Manley' - not sure that will mean anything to anyone who is not a football fan.)
Obviously living in Colorado there is not a lot of Redskins merchandise around, so I decided to get some heat transfer vinyl (HTV) and make something myself. As luck would have it I belong to a Facebook group (Silhouette Cameo and SD Users) and a lovely lady named Jill posted a tumbler that she had decorated with a Redskins logo. I decided to be cheeky as ask her if she would mind sharing the file, and she said YES! I want to re-iterate that Jill made this file, she took the image, traced it and made it into an SVG file. I have traced a few images for myself and this can take a lot of time and effort for some images - this would be one of those images. Thank you so much Jill for all your hard work on this. Here is the logo on the finished shirt.
I used my Cameo to cut the vinyl, I use the pre-set settings for smooth heat transfer vinyl but usually up the blade setting from 2 to 3. Each of the different colours needed to be ironed on separately, so it is important to check whether the are hot or cold peel. I get my vinyl from Nick at Craft Vinyl, he has great prices and usually very speedy service.
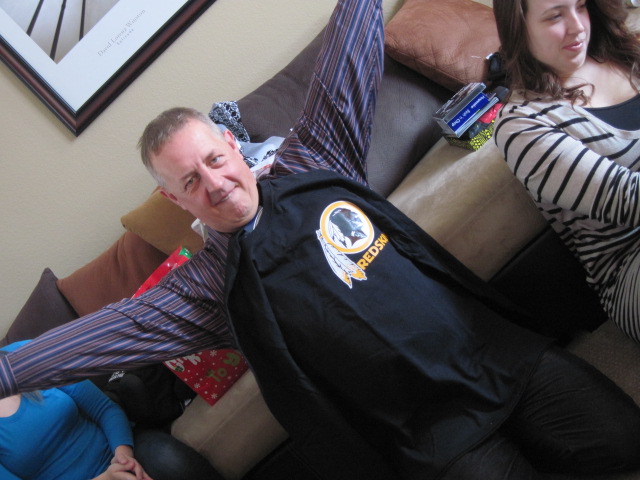
This is my husbands reaction when he opened the box.
Thank you again Jill, and thanks everyone for stopping by today.
Michelle
I wanted to share this sweatshirt that I made as a Christmas gift for my husband - it was a huge hit. My husband is a big Redskins fan, (strange as we live in Colorado!) He became a fan way back in 1983 when he was in England. He was with some friends and they were watching the Superbowl between Miami Dolphins and the Washington Redskins - everyone else was cheering for the Dolphins so he decided to cheer for the Redskins. The Redskins won, and he has been a fan ever since (we even had a cheese plant named 'Joe Gibbs' and a fish named 'Dexter Manley' - not sure that will mean anything to anyone who is not a football fan.)
Obviously living in Colorado there is not a lot of Redskins merchandise around, so I decided to get some heat transfer vinyl (HTV) and make something myself. As luck would have it I belong to a Facebook group (Silhouette Cameo and SD Users) and a lovely lady named Jill posted a tumbler that she had decorated with a Redskins logo. I decided to be cheeky as ask her if she would mind sharing the file, and she said YES! I want to re-iterate that Jill made this file, she took the image, traced it and made it into an SVG file. I have traced a few images for myself and this can take a lot of time and effort for some images - this would be one of those images. Thank you so much Jill for all your hard work on this. Here is the logo on the finished shirt.
I used my Cameo to cut the vinyl, I use the pre-set settings for smooth heat transfer vinyl but usually up the blade setting from 2 to 3. Each of the different colours needed to be ironed on separately, so it is important to check whether the are hot or cold peel. I get my vinyl from Nick at Craft Vinyl, he has great prices and usually very speedy service.
This is my husbands reaction when he opened the box.
Thank you again Jill, and thanks everyone for stopping by today.
Michelle
Thursday, September 6, 2012
Layering Heat Transfer Vinyl
My post today is pretty quick and simple -a little project showing layered heat transfer vinyl. I should have posted this last night, but was too busy having my own 'pity party' about some 'hiccup' in my life. Anyway on with the project.
These are the items I altered.
I am altering these items for two very special children who are having a HUGE celebration later this month - they are celebrating their new family name. Maybe not a big deal for most, but for these guys it really is huge. These children have been though a lot (a whole heap) and are currently being fostered by an amazing family. I cannot imagine a better celebration than something like this, our family name that gives us a real sense of belonging.
So here is what I did.
I layered the silver HTV on top of black to make the name really stand out. It really is not too difficult if you are patient and take the process slowly. My HTV is from Nick at Craft Vinyl. I thoroughly recommend buying from him, he has excellent service, great colour selection and prices. He sends out very detailed instructions with his vinyl, and as long as you follow the steps you can't go wrong. Here is a close up.
The font that I used is called 'Superheterodyne' and is available for free here. I cut all the HTV with my Cameo on their recommended settings for T-shirt vinyl -that machine sure makes it a breeze, but DON"T FORGET to do a test cut to make sure you don't cut all the way through the vinyl backing.
Here are the altered Hello Kitty sweatshirt and bag.
This font is called 'Bebas'. Again I cut all the HTV on my Cameo, the only change I made was increasing the blade depth for cutting the glitter vinyl. Here are a couple of close-ups.
After this project I can honestly say I am in love with glitter HTV - the pictures don't do it justice, it looks fabulous.
I hope when you have a 'hiccup' in life, (mine by the way was my daughters car getting broken into, stuff was taken but at the end of the day it was just 'stuff',) you will spare a thought for children in tough situations. A good friend of mine who I greatly admire took time to point out to me that it "isn't all juvenile delinquents in the foster care system, there are children too many of whom who have been hurt or traumatized through no fault of their own."
So here's to two very special children on their very special day.
Michelle
These are the items I altered.
I am altering these items for two very special children who are having a HUGE celebration later this month - they are celebrating their new family name. Maybe not a big deal for most, but for these guys it really is huge. These children have been though a lot (a whole heap) and are currently being fostered by an amazing family. I cannot imagine a better celebration than something like this, our family name that gives us a real sense of belonging.
So here is what I did.
I layered the silver HTV on top of black to make the name really stand out. It really is not too difficult if you are patient and take the process slowly. My HTV is from Nick at Craft Vinyl. I thoroughly recommend buying from him, he has excellent service, great colour selection and prices. He sends out very detailed instructions with his vinyl, and as long as you follow the steps you can't go wrong. Here is a close up.
The font that I used is called 'Superheterodyne' and is available for free here. I cut all the HTV with my Cameo on their recommended settings for T-shirt vinyl -that machine sure makes it a breeze, but DON"T FORGET to do a test cut to make sure you don't cut all the way through the vinyl backing.
Here are the altered Hello Kitty sweatshirt and bag.
This font is called 'Bebas'. Again I cut all the HTV on my Cameo, the only change I made was increasing the blade depth for cutting the glitter vinyl. Here are a couple of close-ups.
After this project I can honestly say I am in love with glitter HTV - the pictures don't do it justice, it looks fabulous.
I hope when you have a 'hiccup' in life, (mine by the way was my daughters car getting broken into, stuff was taken but at the end of the day it was just 'stuff',) you will spare a thought for children in tough situations. A good friend of mine who I greatly admire took time to point out to me that it "isn't all juvenile delinquents in the foster care system, there are children too many of whom who have been hurt or traumatized through no fault of their own."
So here's to two very special children on their very special day.
Michelle
Wednesday, May 30, 2012
A 'Dangerous' HTV Project
I think I have mentioned before that my youngest daughter, Phoebe, became involved in Roller Derby just over a year ago. She started off in the junior league last summer, then in January she tried out for the adult league of the Denver Roller Dolls. She was successful and became a 'baby doll' - which meant that she had to attend a number of training's/practices and learn certain skills before she could 'test-up' to be on one of the four Denver teams. Last week, she did just that testing up to A- status. This means she can be drafted to a team, and scrimmage with them - she is not yet allowed to bout at Roller Derby events.
So she tells me she needs a couple of shirts to scrimmage in, with her derby name ('Shebe Dangerous') and number on - TODAY! Thank goodness I try to keep black and white heat transfer vinyl on hand, and my Cameo is ready to go at a moments notice. The font I used for this is called 'Wanted', the HTV is cut using the Silhouette recommended settings for vinyl (with the exception of my blade being on a depth of 2).
Here are the finished shirts.
WAY TO GO PHOEBE!
Michelle
So she tells me she needs a couple of shirts to scrimmage in, with her derby name ('Shebe Dangerous') and number on - TODAY! Thank goodness I try to keep black and white heat transfer vinyl on hand, and my Cameo is ready to go at a moments notice. The font I used for this is called 'Wanted', the HTV is cut using the Silhouette recommended settings for vinyl (with the exception of my blade being on a depth of 2).
Here are the finished shirts.
WAY TO GO PHOEBE!
Michelle
Thursday, March 8, 2012
Heat Transfer Vinyl and Rhinestone T-Shirt (Part 1)
I bought this plain t-shirt last year thinking that it would be good to use for heat transfer vinyl (HTV). I had lots of different ideas swirling around in my head, and that is where they stayed, because life got busy. So today I decided to 'bite the bullet' and finally do the project.
I started with just a plain long sleeved t-shirt, and picked out a design from my Silhouette studio. I started out by cutting my design out on plain paper and laying it on the shirt to see how it would look.
Originally I had made the design 12" x 12", then I discovered that my vinyl was 12" x 9" so I had to make a few adjustments to the size. Here is the original design, it's called floral filigree.
Because I knew that I wanted to put rhinestones in the centre of the flower, I had to adjust the design to make the centre a blank space. I had to take each of the shapes from the middle and delete them ( you need to ungroup them first.)
When I had gotten rid of all the little shapes, I took the 'draw freehand' pencil and drew a shape which would be cut out from the centre.

When I was happy with my freehand shape I grouped it with the rest of them image. This is important to remember as some images need to be flipped before cutting them in vinyl (letters are a good example of this.)
Next I moved on to cutting my image out of the HTV. I got my HTV from Craft Vinyl - the prices here are great and Nick is very efficient with fulfilling the orders and shipping.
HTV needs to be cut with the DULL SIDE FACING UP and the SHINY SIDE FACING UP (the exact opposite of how you cut regular vinyl.) Here are the settings which I used on my Cameo.
Once the HTV was cut I started to 'weed' - that is, peel away all the unwanted parts of the image, leaving the main image attached to the backing (this backing acts as transfer tape.) Here is the partially 'weeded' image.
Now for the fun part - applying the image to the shirt. First I ironed my shirt, just to make sure I'd removed any moisture. Next I laid the image where I wanted it on the shirt, covered it with a Teflon sheet and began ironing. The HTV comes with full instructions for applying, but basically the iron needs to be 280-300F, press the iron down on the Teflon sheet moving it back and forth, not staying in anyone place for more than a few seconds. This HTV is 'cold peel' which means that it needs to cool down for 30 - 45 seconds before trying to peel off the backing. Here is the image applied.
Tomorrow I will post pictures of the finished shirt with instructions for adding rhinestones.
Thanks for stopping by.
Michelle
I started with just a plain long sleeved t-shirt, and picked out a design from my Silhouette studio. I started out by cutting my design out on plain paper and laying it on the shirt to see how it would look.
Originally I had made the design 12" x 12", then I discovered that my vinyl was 12" x 9" so I had to make a few adjustments to the size. Here is the original design, it's called floral filigree.
Because I knew that I wanted to put rhinestones in the centre of the flower, I had to adjust the design to make the centre a blank space. I had to take each of the shapes from the middle and delete them ( you need to ungroup them first.)
When I had gotten rid of all the little shapes, I took the 'draw freehand' pencil and drew a shape which would be cut out from the centre.
When I was happy with my freehand shape I grouped it with the rest of them image. This is important to remember as some images need to be flipped before cutting them in vinyl (letters are a good example of this.)
Next I moved on to cutting my image out of the HTV. I got my HTV from Craft Vinyl - the prices here are great and Nick is very efficient with fulfilling the orders and shipping.
HTV needs to be cut with the DULL SIDE FACING UP and the SHINY SIDE FACING UP (the exact opposite of how you cut regular vinyl.) Here are the settings which I used on my Cameo.
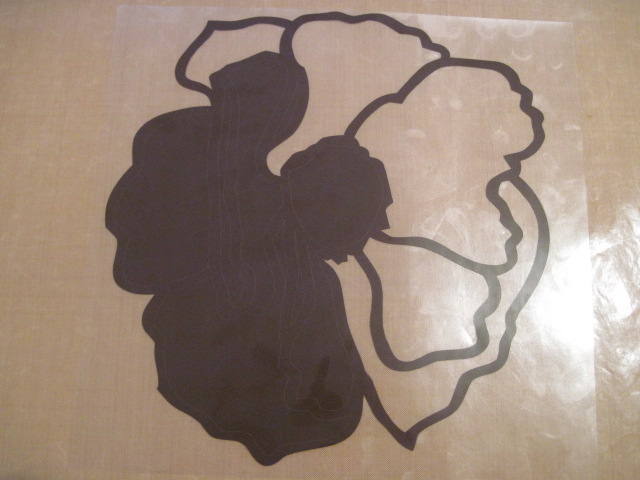
Once the HTV was cut I started to 'weed' - that is, peel away all the unwanted parts of the image, leaving the main image attached to the backing (this backing acts as transfer tape.) Here is the partially 'weeded' image.
Now for the fun part - applying the image to the shirt. First I ironed my shirt, just to make sure I'd removed any moisture. Next I laid the image where I wanted it on the shirt, covered it with a Teflon sheet and began ironing. The HTV comes with full instructions for applying, but basically the iron needs to be 280-300F, press the iron down on the Teflon sheet moving it back and forth, not staying in anyone place for more than a few seconds. This HTV is 'cold peel' which means that it needs to cool down for 30 - 45 seconds before trying to peel off the backing. Here is the image applied.
Tomorrow I will post pictures of the finished shirt with instructions for adding rhinestones.
Thanks for stopping by.
Michelle
Sunday, January 15, 2012
Baby LO's and Onesies.
In a couple of weeks I'm going to a baby shower for a friend. I've know about this since before Christmas, and at the time was asked if I could make a LO or two. Simple enough, but for some reason I have put this off and found other projects that need my attention. Why? This shower is for a boy!!!!! I have girls, which equals lots of pink paper, flowers ribbons and bows - how do I do a LO for a baby boy? My next hurdle is how to do a LO with no pictures? I usually make my LO's with my pictures sitting in front of me and work from there.
So this weekend I just decided to go to my craft room and 'bite the bullet'. After a little searching through my papers I found a few blues/denims, and a great paper stack that my secret Christmas elf (Allison) got me, called "Just Chillin'" (Making Memories). So here is the first LO I came up with.
Just something fairly simple and straightforward for two 4x6 photos. Here are some close-ups of some of the page elements, including the title which is a file from the Silhouette online store which I cut with my Cameo.
I love how simple this title was to cut and make the shadows for, just by using the 'offset' button in Silhouette Designer Studio.
For my next LO I went to Page Maps for some inspiration, and found just the right sketch to make this.
With the exception of the background paper all the other papers are from the "Just Chillin'" stack. The title and all elements were again cut with my Cameo.
I am really quite happy with the way they turned out, and as I was 'on a roll' I decided to pull out some heat transfer vinyl and have fun with some onesies.
For the Chick Magnet onesie I used the Creative Memories Storks Delivery Cart for the font and the Easter 2010 cart for the chick. The other onesie is made using the same cut that I used on my first LO.
Thanks for stopping by.
Michelle
So this weekend I just decided to go to my craft room and 'bite the bullet'. After a little searching through my papers I found a few blues/denims, and a great paper stack that my secret Christmas elf (Allison) got me, called "Just Chillin'" (Making Memories). So here is the first LO I came up with.
Just something fairly simple and straightforward for two 4x6 photos. Here are some close-ups of some of the page elements, including the title which is a file from the Silhouette online store which I cut with my Cameo.
I love how simple this title was to cut and make the shadows for, just by using the 'offset' button in Silhouette Designer Studio.
For my next LO I went to Page Maps for some inspiration, and found just the right sketch to make this.
With the exception of the background paper all the other papers are from the "Just Chillin'" stack. The title and all elements were again cut with my Cameo.
For the Chick Magnet onesie I used the Creative Memories Storks Delivery Cart for the font and the Easter 2010 cart for the chick. The other onesie is made using the same cut that I used on my first LO.
Thanks for stopping by.
Michelle
Wednesday, November 9, 2011
Baby Onesies - Heat Transfer Vinyl
Feels like I've been away from my blog for ages - no apologies, as I was having too much fun with my friend visiting from the UK. Lots of shopping, Starbucks and Christmas Craft Fairs. Sadly her visit was over all too soon and now I'm back to reality.
So on with my project. My husband had asked me to make some onesies for a co-worker who's wife just had a baby boy. Of course he wants them 'yesterday', so I had to make do with the colours of heat transfer vinyl I had on hand. Here they are.
I used two cartridges to make the first one. Creative Memories Stork's Delivery - Sugar and Spice Font cut at 2", and Easter 2010 for the chicks cut at 1.5".
For the second one I also used the Sugar and Spice font from Stork's Delivery cut at 1.25". This is supposed to be the 'girl' font on the cartridge, but I think it is adorable and wanted to use it even though these onsies are for a boy.
And a close up.
The third one I made I will admit up front is not an original idea. My friend Allison over at Goody Bag Diva, made an adorable onesie with a ketchup bottle and 'little squirt' on the front, take a look at it here. So this is my version.
The ketchup bottle is from the Block Party lite cartridge and is cut at 6". I love working with heat transfer vinyl, the results can be so gratifying - but I will admit I was a little nervous as I had never layered different coloured vinyl. The vinyl I used for this project is from H & H Sign Supply, and is Siser Easyweed. There is a video on the website showing how to apply this product, but basically I used my iron set on 'cotton', used my Teflon craft sheet to iron over the vinyl, and peeled it off while it was still warm. The settings I used on my Cricut Expression were Blade Depth 3, Speed 3 and Pressure 3. Probably the most important thing to remember with the heat transfer vinyl is that the images need to be CUT IN REVERSE (obviously particularly important for lettering.)
Here is a picture of the back of the 'ketchup onesie'.
Once again the font is Sugar and Spice cut at 1.5', and the 'squirt of ketchup' is actually a 'splash' from Disney Princesses Dreams Come True, also cut at 1.5". Thanks so much Allison for the inspiration, and allowing me to 'steal' your idea.
I really had a lot of fun making these, and I'm looking forward to my next heat transfer vinyl project. Thanks for looking.
So on with my project. My husband had asked me to make some onesies for a co-worker who's wife just had a baby boy. Of course he wants them 'yesterday', so I had to make do with the colours of heat transfer vinyl I had on hand. Here they are.
I used two cartridges to make the first one. Creative Memories Stork's Delivery - Sugar and Spice Font cut at 2", and Easter 2010 for the chicks cut at 1.5".
For the second one I also used the Sugar and Spice font from Stork's Delivery cut at 1.25". This is supposed to be the 'girl' font on the cartridge, but I think it is adorable and wanted to use it even though these onsies are for a boy.
And a close up.
The third one I made I will admit up front is not an original idea. My friend Allison over at Goody Bag Diva, made an adorable onesie with a ketchup bottle and 'little squirt' on the front, take a look at it here. So this is my version.
The ketchup bottle is from the Block Party lite cartridge and is cut at 6". I love working with heat transfer vinyl, the results can be so gratifying - but I will admit I was a little nervous as I had never layered different coloured vinyl. The vinyl I used for this project is from H & H Sign Supply, and is Siser Easyweed. There is a video on the website showing how to apply this product, but basically I used my iron set on 'cotton', used my Teflon craft sheet to iron over the vinyl, and peeled it off while it was still warm. The settings I used on my Cricut Expression were Blade Depth 3, Speed 3 and Pressure 3. Probably the most important thing to remember with the heat transfer vinyl is that the images need to be CUT IN REVERSE (obviously particularly important for lettering.)
Here is a picture of the back of the 'ketchup onesie'.
Once again the font is Sugar and Spice cut at 1.5', and the 'squirt of ketchup' is actually a 'splash' from Disney Princesses Dreams Come True, also cut at 1.5". Thanks so much Allison for the inspiration, and allowing me to 'steal' your idea.
I really had a lot of fun making these, and I'm looking forward to my next heat transfer vinyl project. Thanks for looking.
Subscribe to:
Posts (Atom)